Kinesiology tape can help relieve symptoms of hay fever (allergic rhinitis). Although CureTape® contains no medicinal additives, pilot studies in 2016 and 2017 revealed that 84% of clients experienced significant relief from hay fever symptoms after applying the tape. This effect likely stems from CureTape®’s ability to calm the allergic reaction mechanism and connective tissue while stimulating the neurogenic system through the skin.
Get started with these items to tape for hay fever
-
CureTape® Classic Kinesiology Tape
-15%Bestseller $16.96
In stockSelect options This product has multiple variants. The options may be chosen on the product page
 -
CureTape® Sports Extra Sticky Kinesiology Tape
-15% $18.66
In stockSelect options This product has multiple variants. The options may be chosen on the product page
 -
Standard scissors
 $14.95
In stockAdd to cart
 -
CureTape® Pre-Tape Spray
 $21.95
In stockAdd to cart
How can kinesiology tape work for hay fever?
Kinesiology taping for hay fever is based on the principle that external skin stimulation can have a reflective influence on the tissue structures of the spinal cord segments belonging to the innervation area. The kinesiology tape applied directly to the skin stimulates skin sensors, which in turn stimulate the neurogenic system in the body.
How does an allergic reaction work in the body?
Hay fever is an allergic reaction to the pollen of shrubs, grasses and trees. In hay fever sufferers, the immune system reacts as soon as pollen enters the body. The body then produces the antibody IgE (Immunoglobin E). The IgE binds to mast cells and basophilic granulocytes. Mast cells are found mainly in the mucous membranes of the respiratory tract, intestine and skin. Basophilic granulocytes are white blood cells with granules (vesicles with their own membrane in the cytoplasm of certain cells in the body). The granules store various substances such as histamine. The IgE receptors are located on the membrane of the cell to which the pollen grains bind. These pollen grains are antigens. Histamine is released and causes the allergic reactions typical of hay fever. The blood vessels dilate and start leaking. It also causes the smooth muscle cells in the lungs to contract.

Christina’s advice when taping your back or chest
When taping your back or chest, it’s crucial to choose a tape that provides strong adhesion and support. That’s why I recommend CureTape kinesiology tape. For regular use, CureTape Classic or Art is ideal. However, if you’re engaging in extreme sports or swimming, opt for the extra sticky CureTape Sports variant!
Segmental explanation for the possible operation of the tape
In the body, a segmental relationships exist. There is an interaction between the muscles, bones, skin, organs and the control systems. These regulating systems include the sympathetic nervous system (provides more air in the lungs, among other things) and the parasympathetic nervous system (ensures rest and recovery).
In hay fever, the lungs and the immune system play an important role. The reflex zones of the lungs in the connective tissue are mainly located thoracically on the back. The sympathetic innervation (nerve control) for the lungs lies in the segments Th2-Th5.
Parasympathetic control takes place via the 10th cranial nerve (vagus nerve). This important floating, longest cranial nerve, springs from the brain stem and branches off to vital organs in the body. The treatment with tape consists of segmental support by a dorsal back tape applied to this lung area. A possible explanation of reduced complaints can be found in the calming effect of the allergic reaction mechanism. The sympathetic system comes to “rest”.
Mechanical explanation for the possible operation of the tape
The literature speaks of the connective tissue (fascia) that plays a major role in immunological defence. The fascia occurs in different structures and thicknesses, it is a network that runs through the whole body. A disturbance in this network can cause complaints in the body, causing tension differences. The body can solve this tension itself, however, treatment is often necessary for a faster recovery of the balance.
The fascia contains many sensors. By applying the tape to the skin, you provide a sensory stimulus to the fascia, which creates a different tension; the connective tissue comes to rest. This, in turn, has a positive impact on the immune system, reducing the body’s response to hay fever and creating substances for an allergic reaction.
Presumably the tension of the fascia and/or the stimulation of the sensors in the skin has a positive effect on the influence of the immunoglobulin IgE and therefore indirectly on the release of histamine.
How to apply kinesiology tape for hay fever
Practice has shown that there are various taping options to achieve a positive result for the hay fever treatment. For the back there are two possibilities:
– Two I-tapes, leaving the spine free.
– An X tape, in which part of the spinal column is taped. With this taping method, the segmental stimulation of the midline is greatest. However, an overreaction is also possible. This is one of the reasons why we recommend having a professional therapist assist you during a hay fever treatment.
As an option:
– Depending on the type of complaint, it is also possible to tape the pectoralis major on the chest side (combined with a back tape) as an option.
During the recent pilot project, the therapists chose to apply the hay fever treatment according to the method described below.
In preparation for taping
It is important that the skin is clean and free of grease, let the client come with a clean skin, also no oil containing shower products may be used beforehand. Oily skin can be cleaned with CureTape® Clean Skin Pre-Taping Spray. For (young) adults, use the 5cm wide CureTape® rolls and let the client choose a colour. For children, it is recommended to cut the 5cm wide CureTape® in half into strips of 2.5cm wide or to use the 2.5cm wide roll of CureTape®. Or even use CureTape Gentle for sensitive skin for people that have thin or sensitive skin.
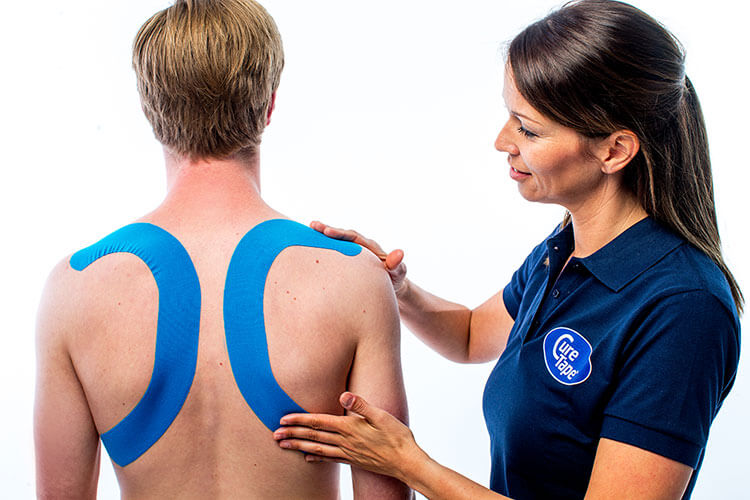
Professional Instructions Tape 1: Dorsal lung area (back tape)
- Have the client sit on the treatment couch with a straight back.
- To determine the length of the tape, measure the distance from Occiput to SIPS.
- Cut two strips to that length and lay the strips upside down on top of each other (with the release paper facing inwards) and cut the ends around.
Applying the tape:
- Have the client, in a sitting position, make a total flexion with the chin on the chest and the arms crossed in front of the chest. The back should be well arched.
- Tear the release paper and unfold the paper flaps. Place the centre of the tape paravertebral at the level of Th2. Then apply the upper part over the supraspinatus area to lateral.
- Then apply the lower part under the notch paravertebrally with very slight stretch (10%-15%), following the rib edge.
- Rub well over the tape structure. Repeat this procedure on the other side.
- The client may then sit upright.
Note: In this taping method for hay fever, the processus spinosi is left free because of the segmental stimulation that is greatest in the midline.
Instructions for non-professionals (self-taping)
- Firstly, let someone help you to reach your back
- Prepare the tape: Measure the distance from the base of the skull to the dimples above the buttocks to determine the tape length.
- Cut two strips of tape to the measured length. Place them sticky side down on a flat surface, one on top of the other, and round off the edges with scissors for better adhesion.
Applying the Tape
- Position yourself: Sit on a chair or stool with your back straight. For better posture, cross your arms in front of your chest and lower your chin toward your chest, rounding your back slightly.
- Place the first strip: Peel off a small section of the backing paper to expose the adhesive in the center of the strip. Place the center of the tape along the spine at the level of the upper back.
- Attach the ends: Stick the upper part of the tape over the shoulder area, angling slightly outward toward the sides. Apply the lower part of the strip down along the rib edge with a very light stretch (10%-15%).
- Rub to activate the adhesive: Gently rub over the tape to ensure it sticks properly to the skin.
- Repeat for the other side: Follow the same steps to apply the second strip on the opposite side of the spine.
- Return to upright position: Once both strips are applied, sit up straight and check that the tape feels comfortable and secure.
Note: The spine is left free of tape in this method to maximize the segmental stimulation, which is most effective along the midline.
How often should I tape for hay fever?
Both evaluations have shown that a positive effect is immediately noticeable after the first taping. Applying the tape a second time after one week has shown that the complaints decrease even more. Depending on the result after two treatments it can be decided to tape a third time to achieve an even better effect. However, the reduction with a third taping is less. It is recommended to leave the tape on for at least 5 days and to apply the next tape after a week.
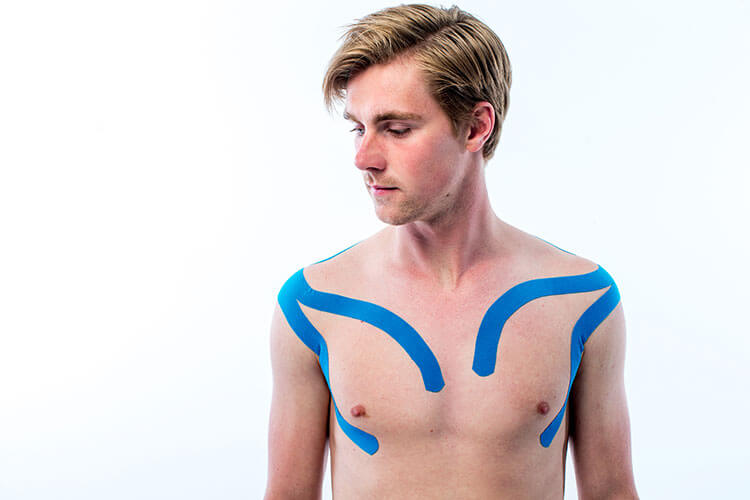
Professional instructions Tape 2: Pectoralis major (chest tape)
*Optional tape
- Measure the tape in an extended position of the arm (exorotation of the arm with additional retraction and abduction of the shoulder). Measure from the middle of the deltoid to the sternum or the sterno-clavicular joint (AC), this is the length of the tape.
- Cut two Y-strips and trim all ends.
Applying the tape:
- Place the base of the Y tape in neutral position at the origin of the pectoralis major. Have the client stretch the muscle by moving the arm backwards and turning the head away, which will stretch the fascia of the neck region.
- Place the top tape strip along the proximal side of the pectoralis major to the sternum with 10 to 15% stretch.
- Run the second strip along the lateral part of the pectoralis muscle, taking care not to apply it over the nipple. Also apply this strip with a 10 to 15% stretch.
- Repeat this operation on the other side and rub the tape well.
Note: Analysis of the 2016 evaluation forms submitted shows that a slightly better result can be achieved when both the back and chest are taped.
Instructions for non-professionals (self-taping)
- Measure the tape: Start by stretching your arm backward and slightly outward. Imagine you are reaching behind you and away from your body. Measure the tape length from the middle of your shoulder (about halfway down your upper arm) to the center of your chest or where your collarbone meets your chest.
- Cut two strips of tape into a “Y” shape. Round off the edges with scissors for better adhesion and comfort.
Applying the Tape
- Position the starting point: Sit or stand in a comfortable position. Place the base of the “Y” tape where your chest muscle (pec) starts, near the front of your shoulder.
- Stretch the muscle: To stretch the chest and neck area, move your arm backward while turning your head slightly away from the side you’re taping. This helps the tape adhere to the skin more effectively.
- Apply the first strip: Take one of the “Y” tape’s arms and stick it along the inner part of your chest muscle toward the center of your chest. Use a gentle stretch (10-15% of the tape’s maximum stretch) for this part.
- Apply the second strip: Stick the other “Y” arm along the outer edge of your chest muscle, ensuring it doesn’t cover sensitive areas like the nipple. Again, apply with a light stretch (10-15%).
- Repeat on the other side: Follow the same steps to tape the other side of your chest.
- Rub to activate the adhesive: Once both sides are taped, gently rub the tape to ensure it sticks properly and activates the adhesive.
Note: Feedback from users shows that taping both the back and chest may provide slightly better results, so consider applying additional tape to the back if needed.
Results of using kinesiology taping in hay fever pilot studies (analysis of evaluation forms 2016 and 2017)
In both the 2016 and 2017 inventories, 84% of hay fever patients indicated that their symptoms decreased after applying the hay fever tape as part of the Kinesiology taping Concept. However, these results from the pilot studies require a comprehensive study.
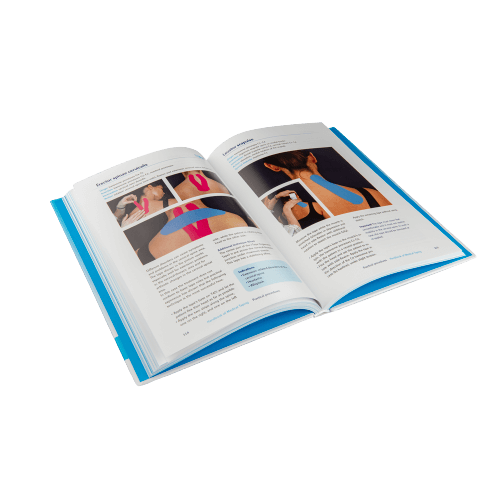
To gain more specific insight into the beneficial effects of Kinesiology taping in hay fever, 139 hay fever patients participated in a test case in 2016 and 147 in 2017. These analyses were carried out by a number of physiotherapists and coordinated by Harry Pijnappel. Harry is the author of the Kinesiology taping Instruction Book, of which approximately 25,000 copies, in seven languages, have been sold by now. Harry is also the initiator of the website fasciaworld.nl, a convenient knowledge base that focuses on research and exchange of information, also about Kinesiology taping. The results of the hay fever research have been analysed in SPSS and processed by a Health Sciences student at the University of Twente, the Netherlands.
In the setup of this first pilot in 2016, CureTape® was applied in two semi-circles on the back (shape of the letter C, with the backs together), to the lung area of the participants. In addition, the front of the body (M. pectoralis major) of some of the participants was also taped with two short pieces of CureTape®. For the 2017 pilot project, two separate I-strips were chosen and the pectoralis on the chest side was also taped.
Conclusions:
Key findings of this pilot
- In 84% of the participants, there was a reduction in symptoms after one, two and/or three taping sessions. For some symptoms, the reduction in symptoms was spectacular, with a VAS score of up to 80%.
- Eight of the nine symptoms had already been significantly reduced after one hay fever treatment, the participants indicated.
- After the second taping session a significant difference in all symptoms was also observed.
- Even after the third taping session the symptoms continued to decrease, however significantly.
- The combi-tape (back and chest) gave the best result.
- With an X-tape an even better result can probably be achieved. However, this is not significant. With this taping method, the segmental stimulation of the midline is the greatest. The inventory has shown that a slightly better result may be achieved with this method, but an overreaction is also possible.
We appreciate everyone who has helped us in recent years to make the pilots happen and would like to thank you very much for this. This has given us a good picture of this taping application and allows us to share knowledge and experiences.
No scientific claim
Please note: this test case does not make any scientific claims, as the number of participants, 139 people and 147 people, was too small for this. Also, there were clients participating in the test case, who were already using medication against hay fever. Also no measurement of placebo effects was done, whereby the effect of the placebo(tape) could be subtracted from the effect of CureTape®. The results of this test case are so promising that we hope that an official study can be done in the future.
Reducing hay fever symptoms with Kinesiology taping treatment with CureTape®? Always have the treatment carried out by a professional practitioner who is familiar with Kinesiology taping!
Learn how to tape
- The Ultimate Taping Guide: Focuses on self-taping for the 30 most common injuries where taping provides support.
- Kinesiology Taping Method Manual: Designed for (para medical) professionals, covering basic taping techniques and various pathologies.
- Decompressive Taping Techniques Manual: Specifically focuses on lymphatic taping methods for decompression.
What are you waiting for? Order a copy today!
THYSOL is the manufacturer of the kinesiology tape brand CureTape. As CureTape, we have been training and supplying professionals for 25 years. And consumers now know how to find us too! By manufacturing all our tapes in our own factory, we can guarantee the best quality!
Please note that the indicated tape applications and information on our website about the possibilities with kinesiology tape have not yet been scientifically proven. The statements and examples mentioned are based on long-term experiences of patients and trained therapists.
Contraindications not to tape: pregnancy, open wounds, broken bones, unexplained complaints, allergies and skin diseases, use of medication such as blood thinners, thrombosis and fever. Always apply tape in consultation with a specialist.

