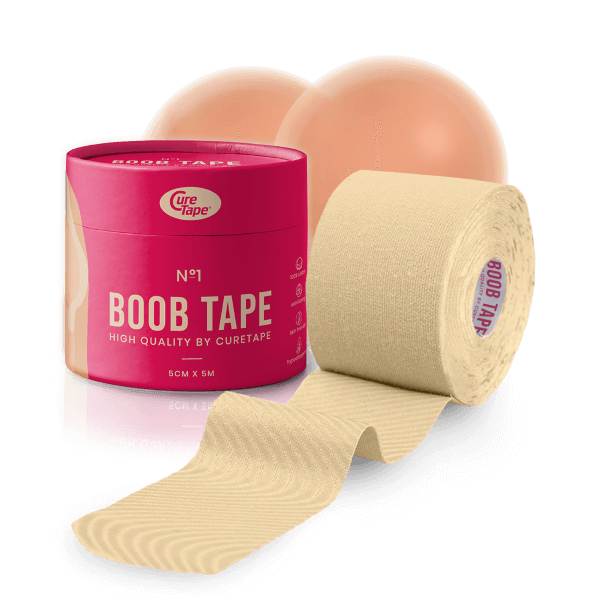
Description

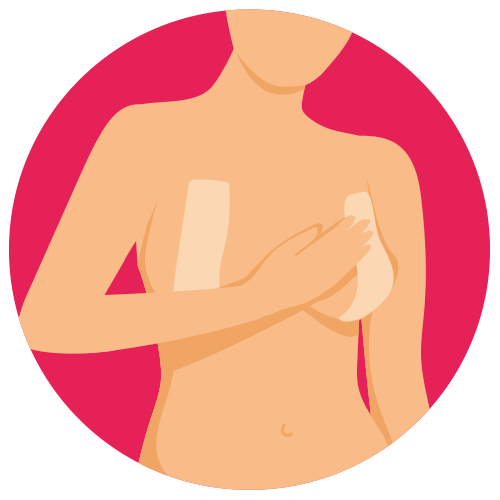
Have you chosen a lovely outfit for a party, but don’t want visible bra straps? Do you want to lift your breasts naturally and showcase beautiful curves, so your favorite blazer, party dress, or top looks even better? Then Boob Tape No.1 is the ideal solution for you! Boob tape provides a subtle but effective lift, giving you confidence and making your outfit look even more radiant!
Features of BoobTape No.1:
- Stretchability from 130% to 140%
- Hypoallergenic 100% acrylic adhesive layer, latex-free.
- Lengthwise stretchable.
- Air and water-permeable, while being water-resistant.
What is Boob Tape?
Boob Tape No.1 by CureTape is a cotton tape with a skin-friendly adhesive, perfect for creating a “no bra-look” fashion style. It offers flexibility and breathability, and you can choose from various styles like strapless or criss-cross. Plus, it’s water-resistant, so you can wear it while showering or swimming. Originally used by therapists for injuries, it’s now popular for fashion purposes.
Initially, Boob Tape No.1 was included in the taping materials used by therapists, including physiotherapists, to manage injuries and conditions. You might have encountered it during treatment for a sports injury or noticed athletes and others with colored tapes on their skin. These tapes serve various purposes, and the concept of using them for fashion purposes emerged from this context.
Tips to correctly apply Boob Tape No.1:
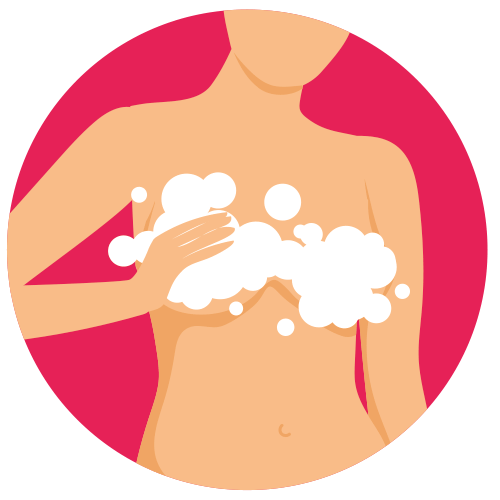
Ensure a clean and oil free skin.
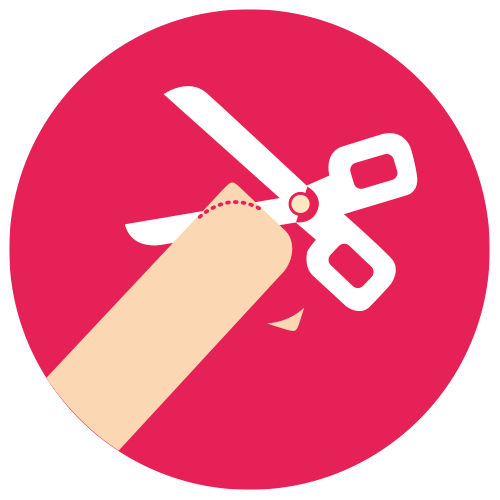
Cut the strips into the right size and round off the edges to prevent peeling in the corners.

Never stretch the tape too much! This could cause irritation.
Rub the tape well after application to activate the adhesive layer.
Tips for Applying BoobTape No.1:
- Make sure your skin is clean and oil-free before using the tape. Don’t use lotions or oils in the area you’re taping because they can make the tape less sticky.
- If your skin is oily, clean it with soap, alcohol, or a Pre Taping Spray.
- Cut the tape into strips beforehand and round the corners for better adhesion.
- Tear the paper in half just before the ends or from the middle to easily remove the tape.
- Avoid stretching the tape at the ends and be gentle during application. Stretching the tape too much is the #1 cause of irritation.
- Rub the tape well after applying it to make sure it sticks properly.
- Never tape over damaged skin or wounds, and avoid wrinkles in the tape.
How to apply boob tape step by step
There are various ways to apply Boob Tape. The method you choose depends on the desired outcome and the type of clothing it will be worn under. It’s crucial not to stretch the ends of the tape during application, as this could lead to skin irritation and damage, possibly resulting in blisters.
Always follow the instructions carefully and avoid haphazard application!
Before you begin, apply Nipple Covers and opt for high-quality Boob Tape like Boob Tape No.1.
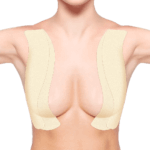
Uplift effect / Boob Lift method
Support and lifting effect. Ideal for deeply cut dresses or tops.
Apply strips of tape from the shoulders to the bottom of the breast for support and a lifting effect. Ideal for creating a beautiful V-neck with a push-up effect under a blazer or deeply cut dress.
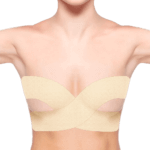
Cross-cross method
Creates a beautiful décolletage. Suitable for tops or dresses with V-necks and spaghetti straps.
Apply strips of tape diagonally from top left to bottom right and vice versa. You can also apply straight strips under the breasts for a lifting effect. This method is suitable for tops or dresses with V-necks and spaghetti straps, creating a stunning décolleté.
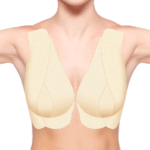
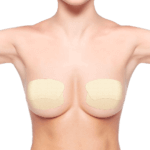
Bandeau – strapless style
Straight and snug but also lifting effect. For outfits with a bare back or strapless top.
Apply strips of tape directly over both breasts, adding slightly more stretch in the middle for a lifting effect on the bottom strip. You can apply the tape alternately from left to right or in the same manner, starting from the middle and then bringing the ends to the sides. This method is suitable for dresses with a bare back.
Side Boob
If you want to push the breasts more towards the center. For deep décolletage or a blazer.
Apply strips of tape from the side of the breast to the center, starting from the top of the shoulder towards the bottom of the breast. The inside is not covered with boob tape. This method is especially useful when your breasts are more on the outer side, helping to push them towards the center without a push-up effect, creating beautiful curves under a blazer or dress with a deep neckline.
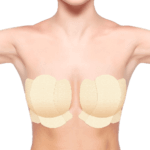
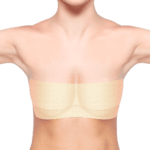
Boobcover
Covering the breasts. Ideal for Off Shoulder or one-shoulder tops, halter tops, or v-neck tops.
Apply strips of tape only over the breast, providing coverage without a lifting effect. Ideal for Off Shoulder tops, one-shoulder dresses, halter tops, or v-neck tops. You can apply the tape horizontally or vertically.
Nipples only
Choose if you don’t want nipples to show through clothing but support is not needed.
Apply strips of tape only over the nipple covers and a small section of skin if you don’t want your nipples to show through clothing.
You can also experiment with other methods or combine the above boob tape techniques to suit your outfit.
Explore which application works best for your outfit!
How to remove BoobTape No.1
Biting down and pulling it off in one go?
You might be tempted to believe that swiftly ripping off boob tape in one go is the optimal method. Our recommendation: don’t do it! It can actually be simpler and less painful with a bit more understanding of the material. Once applied, the boob tape establishes a connection with the uppermost layer of skin. Consequently, when you peel off the tape, you’re inadvertently stripping away those top skin cells.
Experiencing redness or skin damage when removing Boob Tape?
Taking off Boob Tape might make your skin a little red, but this usually goes away after a while. It’s normal for skin to react this way. However, removing the tape could also cause skin damage. This might happen because of how you remove it or because of the type of tape you use. Sadly, many Boob Tape brands have strong adhesive that can hurt your skin. Since Boob Tape doesn’t need approval like medicine does, there are lots of different brands out there. They might all look alike, but they’re not all the same quality. Our brand however, is made in the same factory as CureTape, that does have all those medical approval. That makes Boob Tape no1 the safest brand of boob tape in the market!
How to remove boob tape step by step:
- The acrylic adhesive layer can be dissolved with oil (olive oil, baby oil, skin oil). Dab the oil onto the tape with a cloth, wait a moment, and then remove the tape. Afterward, clean the skin thoroughly with soap or alcohol. Despite the adhesive not dissolving in water, most people find it convenient to remove the tape while showering.
- Remove bit by bit: Never remove the tape in one swift motion. The best way to remove tape from the skin is by holding the skin with one hand while gently rolling the tape off piece by piece with the other hand. Alternatively, you can pull horizontally on the tape to loosen it from the skin. Experiment to find which method works best for you.